Table of Contents
Transform your living space with the timeless elegance of traditional wall panelling. This comprehensive guide reveals everything you need to know about creating authentic period-style panelling that adds character, value, and sophistication to any home.
Introduction: The Enduring Appeal of Traditional Wall Panelling
Wall panelling traditional style has experienced a remarkable renaissance in contemporary interior design. Once reserved for stately homes and historic buildings, traditional panelling now graces modern residences worldwide, offering a perfect blend of classical elegance and practical functionality.
Traditional wall panelling transforms ordinary rooms into sophisticated spaces that exude warmth, character, and architectural interest. Whether you’re renovating a period property or adding heritage charm to a new build, understanding the principles of traditional panelling design is essential for achieving authentic, professional results.
This guide explores the history, styles, materials, installation techniques, and design considerations that will help you successfully incorporate wall panelling traditional aesthetics into your home. From Georgian wainscoting to Victorian picture rails, we’ll cover everything you need to create stunning traditional panelling that stands the test of time.
Understanding Traditional Wall Panelling: History and Heritage
The Origins of Decorative Panelling
Traditional wall panelling emerged in medieval Europe as a practical solution to cold, damp stone walls. Early panelling consisted of wooden boards fitted into frames, creating an insulating layer that improved comfort while adding decorative appeal. By the Tudor period (1485-1603), oak panelling had become a status symbol, with elaborate carved designs adorning the walls of wealthy estates.
The Georgian era (1714-1830) refined panelling into an art form. Symmetrical designs, classical proportions, and elegant mouldings characterized this period. Wall panelling traditional Georgian style typically featured raised and fielded panels within simple framework, often painted in fashionable colors like Wedgwood blue or soft cream.
Victorian times (1837-1901) saw panelling evolve further, with dado rails dividing walls into distinct sections and picture rails providing practical hanging solutions. The Victorians loved rich, dark woods and ornate detailing, creating panelling schemes that reflected the period’s love of grandeur and craftsmanship.
Why Traditional Panelling Remains Popular Today

Modern homeowners choose traditional wall panelling for numerous compelling reasons:
Architectural Character: Panelling adds instant architectural interest to plain walls, creating focal points and visual depth that contemporary minimalism often lacks. Traditional panelling designs provide structure and rhythm to interior spaces.
Property Value Enhancement: Quality traditional panelling significantly increases home value. Estate agents consistently report that period features, including authentic or well-executed reproduction panelling, attract premium buyers and command higher prices.
Practical Benefits: Beyond aesthetics, wall panelling traditional installations offer excellent insulation properties, protecting walls from damage while reducing noise transmission between rooms. Panelling conceals imperfect walls and provides durable, long-lasting surfaces that withstand daily wear far better than painted plaster alone.
Versatility: Traditional panelling adapts beautifully to various room types. Hallways benefit from protective wainscoting, dining rooms gain formality from full-height panelling, and bedrooms achieve cozy intimacy through carefully proportioned schemes.
Timeless Appeal: Unlike trendy finishes that quickly date, traditional panelling possesses enduring elegance. Quality panelling installed today will remain stylish for decades, potentially centuries, making it a wise long-term investment in your home’s interior.
Types of Traditional Wall Panelling Styles
Georgian Panelling: Elegant Simplicity
Georgian wall panelling traditional style epitomizes refined restraint. Characterized by mathematical precision and classical proportions, Georgian panelling creates sophisticated interiors through understated elegance rather than ornate decoration.
Key Features:
- Raised and fielded panels with beveled edges
- Symmetrical arrangement following classical proportions
- Simple, clean mouldings without excessive ornamentation
- Panel heights typically following golden ratio principles
- Often painted in period-appropriate colors: soft whites, subtle grays, elegant greens, or warm stone tones
Ideal Applications: Georgian panelling suits formal reception rooms, dining rooms, entrance halls, and studies where refined elegance is desired. This style works particularly well in properties built between 1714 and 1830 but adapts beautifully to contemporary spaces seeking classical sophistication.
Victorian Panelling: Rich Detail and Depth
Victorian wall panelling traditional design embraced elaborate decoration and rich materiality. This period favored darker woods, intricate mouldings, and complex multi-level schemes that created dramatic, luxurious interiors.
Key Features:
- Dado rails dividing walls into distinct upper and lower sections
- Picture rails for hanging artwork without wall damage
- Rich wood species: oak, mahogany, walnut displaying natural grain
- Elaborate moulding profiles with multiple layers and details
- Combination of different panel sizes and orientations
- Decorative corner blocks and rosettes
Ideal Applications: Victorian panelling excels in libraries, formal dining rooms, billiard rooms, and master bedrooms where grandeur and warmth are priorities. This style particularly suits Victorian-era homes but can add character to any property when carefully adapted.
Edwardian Panelling: Lighter Refinement
Edwardian wall panelling (1901-1910) marked a reaction against Victorian excess, favoring lighter woods, simpler designs, and brighter, more airy interiors while maintaining traditional craftsmanship standards.
Key Features:
- Lighter wood species and finishes: pine, birch, light oak
- Simplified moulding profiles maintaining quality without heaviness
- Dado height panelling with painted or papered upper walls
- Arts and Crafts movement influences in some examples
- Greater emphasis on natural wood grain and texture
Ideal Applications: Edwardian panelling works beautifully in breakfast rooms, morning rooms, bedrooms, and corridors where traditional character is desired without overwhelming smaller spaces.
Shaker-Style Panelling: American Traditional
While originating from Shaker religious communities in America, Shaker-style panelling represents an important traditional approach characterized by functional simplicity and honest craftsmanship.
Key Features:
- Flat recessed panels within simple framework
- Minimal moulding profiles, often just flat boards
- Emphasis on proportion and utility over decoration
- Natural wood finishes or simple painted surfaces
- Clean lines and unadorned surfaces
Ideal Applications: Shaker panelling suits kitchens, utility rooms, bedrooms, and casual living spaces where understated traditional charm is preferred over formal grandeur.
Choosing Materials for Traditional Wall Panelling
Traditional Timber Species
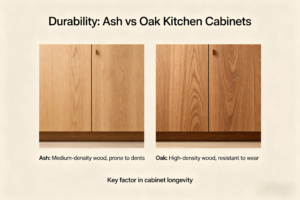
Oak: The quintessential choice for traditional wall panelling, oak offers exceptional durability, beautiful grain patterns, and authentic period character. European oak provides tight grain suitable for painting, while American oak displays more pronounced grain ideal for natural finishes. Oak’s hardness ensures longevity, though it commands premium pricing.
Pine: Softwood pine represents the most economical traditional panelling option. Despite being softer and more prone to dents, quality pine accepts paint beautifully and machines easily for intricate moulding profiles. Knotty pine offers rustic charm, while clear pine provides smoother surfaces for formal installations.
Mahogany: Favored during Victorian times, mahogany delivers rich reddish-brown tones and fine, straight grain that polishes to magnificent luster. Though expensive, mahogany’s stability and beauty justify the investment for prestigious installations replicating authentic Victorian grandeur.
Poplar: An economical hardwood alternative to oak, poplar machines smoothly and paints exceptionally well, making it ideal for painted traditional panelling schemes. Its fine, uniform grain minimizes preparation work while providing adequate durability for most applications.
Modern Material Alternatives
MDF (Medium-Density Fiberboard): Engineered MDF offers perfectly smooth, stable surfaces ideal for painted traditional panelling at significantly lower cost than solid timber. High-quality MDF accepts intricate moulding profiles and provides consistent results without wood grain showing through paint. However, MDF lacks authenticity for natural wood finishes and requires moisture-resistant varieties in damp-prone areas.
Moisture-Resistant MDF: Specifically formulated for bathrooms and kitchens, moisture-resistant MDF (often green-tinted) combines MDF’s advantages with improved water resistance, though it’s not completely waterproof and requires proper sealing.
Plywood: Stable, strong, and less prone to expansion than solid timber, plywood works well for backing panels in traditional designs. Hardwood-faced plywood can provide natural wood appearance at lower cost than solid timber, particularly for large panel areas.
Hardware and Fixings
Traditional wall panelling traditional installations require specific hardware:
- Panel adhesive: High-quality wood adhesive or panel adhesive provides primary attachment
- Pins and nails: Lost-head nails or brad pins for discrete fixing
- Screws: For secure attachment of framework to walls
- Wall plugs: Appropriate to your wall construction (masonry, drywall, etc.)
- Panel pins: Thin nails for delicate mouldings
- Wood filler: For filling nail holes and joints before painting
Planning Your Traditional Panelling Project
Measuring and Designing Panel Layouts
Successful wall panelling traditional design relies on careful planning and proportional accuracy. Professional results require mathematical precision combined with aesthetic judgment.
Establishing Proportions: Traditional panelling follows classical proportion principles. The golden ratio (1:1.618) often governs panel dimensions, though practical considerations sometimes necessitate adjustments. Panels should generally be taller than wide, typically in ratios between 1:1.5 and 1:2.
Standard Heights:
- Full-height panelling: Floor to ceiling, typically 2.4-3.0 meters
- Dado height: 900-1100mm from floor, the traditional height of chair backs
- Wainscoting: Lower third of wall height, approximately 750-900mm
- Picture rail height: 1900-2100mm, allowing adequate space above for artwork
Panel Spacing: Calculate panel widths by dividing wall lengths by desired number of panels, ensuring consistent spacing. Account for corner treatments, door frames, and architectural features. Avoid awkward narrow panels at wall ends by adjusting overall layout.
Creating Scale Drawings: Before purchasing materials, create detailed drawings showing exact panel positions, dimensions, and moulding profiles. Include:
- Overall wall dimensions
- Panel framework positions
- Individual panel sizes
- Moulding profiles and dimensions
- Door and window treatments
- Corner details
Room-Specific Considerations
Hallways and Entrances: High-traffic areas benefit from durable wainscoting or dado-height panelling that protects walls from scuffs and impacts. Dark or medium tones hide wear better than pristine whites. Consider wider mouldings for greater wall protection.
Dining Rooms: Full-height or picture-rail-height panelling creates formal elegance appropriate to traditional dining rooms. Darker woods or rich painted finishes establish sophisticated atmospheres complementing fine furniture and lighting.
Living Rooms: Balance panelling ambition with room proportions. Large reception rooms accommodate elaborate full-height schemes, while smaller living rooms benefit from wainscoting or dado designs that add interest without overwhelming space.
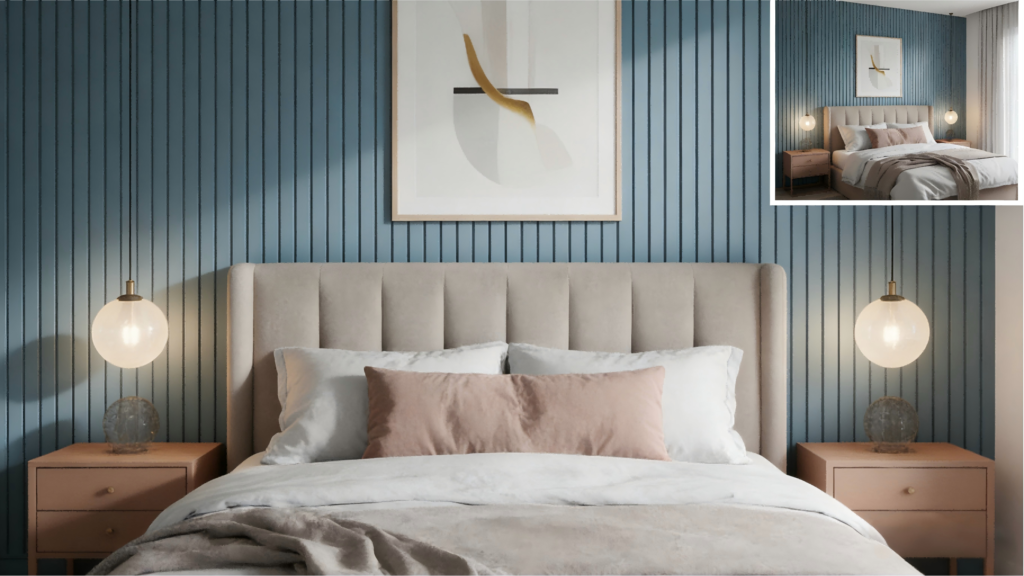
Bedrooms: Lighter panelling finishes create restful environments. Wainscoting behind beds provides attractive headboard alternatives, while full-height panelling in master bedrooms adds luxury without formal stuffiness.
Bathrooms: Moisture-resistant materials are essential. Traditional tongue-and-groove beadboard panelling suits bathrooms perfectly, offering practical water resistance combined with authentic period charm. Seal thoroughly with appropriate finishes.
Installation Process: Step-by-Step Guide
Surface Preparation
Quality traditional wall panelling traditional installation begins with proper wall preparation. Time invested in preparation yields superior finished results.
Wall Assessment: Examine walls for damp issues, structural problems, or surface irregularities. Address any damp problems before panelling installation to prevent rot and deterioration. Remove loose plaster, fill significant holes, and ensure surfaces are structurally sound.
Leveling and Straightening: Use a long spirit level to check walls for plumb and flat. Traditional panelling requires reasonably flat surfaces for proper installation. Plaster out significant hollows or consider using battening to create level fixing surfaces.
Marking Out: Transfer your scale drawings onto walls using pencil, chalk lines, and spirit levels. Mark positions for all framework members, ensuring perfect vertical and horizontal alignment. Check and recheck measurements at this stage.
Installing the Framework
Battening the Walls: Begin by attaching vertical battens (typically 45x20mm timber) at approximately 400-600mm centers along walls. Use a spirit level to ensure perfect vertical alignment. Fix battens securely to walls using appropriate fixings for your wall construction. Horizontal battens may be required at panel top and bottom edges.
Creating the Frame: Within the battened framework, install the inner framework that defines individual panel positions. This framework typically uses 70-95mm wide flat timber (often 6-19mm thick) creating frames around each panel area. Carefully measure and cut each piece, joining corners with miter joints or butt joints depending on design complexity.
Securing Framework: Fix framework pieces to battens using adhesive and panel pins or screws. Countersink fixings and fill holes. Check that all framework sits flush and level using straight edges and spirit levels.
Installing Panels and Mouldings
Cutting Panels to Size: Measure each panel opening individually rather than assuming identical dimensions. Cut panels (whether solid timber, MDF, or plywood) approximately 1-2mm smaller than openings to allow for expansion and ease of fitting.
Fixing Panels: Apply panel adhesive around panel edges and fix into position within framework. Use panel pins around edges for additional security, spacing pins approximately 150-200mm apart. Countersink pins and fill holes.
Installing Mouldings: Add decorative mouldings around panel edges to create raised and fielded effects or to cover panel-to-framework joints. Cut mouldings with precise 45-degree miter joints at corners. Fix using panel adhesive and pins, ensuring tight joints. Common traditional moulding profiles include:
- Ogee: Classic S-curved profile
- Ovolo: Quarter-round convex curve
- Torus: Semicircular convex profile
- Scotia: Concave quarter-round
- Astragal: Small half-round bead
Dado Rails and Picture Rails: Install horizontal rails at appropriate heights using similar techniques. Ensure rails are perfectly level and securely fixed. Join sections with scarf joints for lengths exceeding single timber pieces.
Skirting Boards: Complete panelling schemes with appropriate period skirting boards. Traditional skirtings range from simple torus profiles to elaborate multi-tiered designs matching panelling style and era.
Finishing Techniques
Filling and Preparation: Fill all nail holes, gaps, and joints using quality wood filler. Sand smooth once dry. Caulk gaps where panelling meets walls, ceilings, or other surfaces using decorator’s caulk. This creates crisp, professional edges and prevents paint bleeding into gaps.
Priming: Apply quality primer appropriate to your material choice. MDF requires special MDF primer that seals its porous surface. Solid timber benefits from oil-based primer or acrylic primer depending on topcoat selection. Prime all surfaces including panel backs to prevent warping.
Painting: Traditional wall panelling looks best with quality paint applied in multiple thin coats rather than one thick coat. Sand lightly between coats for ultra-smooth finishes. Period-appropriate colors include:
- Georgian: Whites, creams, soft grays, subtle greens, elegant blues
- Victorian: Deeper greens, rich reds, warm browns, heritage colors
- Edwardian: Lighter tones, soft pastels, natural wood stains
Natural Wood Finishes: For exposed timber panelling, apply wood stain if desired, followed by protective varnish, oil, or wax. Multiple coats provide better protection and richer color depth. Traditional oil finishes develop beautiful patina over time.
Design Tips for Authentic Traditional Style
Maintaining Period Consistency
Authentic traditional wall panelling requires attention to period-appropriate details. Research your chosen era thoroughly, studying photographs of genuine period interiors to understand characteristic features, proportions, and finishes.
Avoid Mixing Eras: Georgian panelling paired with Victorian ceiling roses creates confused aesthetics. Choose one period style and maintain consistency throughout room elements including cornicing, ceiling treatments, door furniture, and light fittings.
Respect Architectural Context: Modern homes benefit from simplified traditional panelling rather than elaborate period recreation. Adapt proportions and details to suit contemporary ceiling heights and room dimensions while maintaining traditional character.
Color Selection Strategies
Period-Appropriate Palettes: Historical paint companies offer authentic period color collections researched from original sources. These colors provide instant period authenticity compared to modern hues.
All-White Schemes: White or off-white panelling creates light, fresh interiors suited to both traditional and contemporary aesthetics. Vary sheen levels between walls and woodwork for subtle definition (e.g., matte walls, satin woodwork).
Two-Tone Treatments: Traditional dado-height panelling invites two-tone color schemes. Darker lower sections conceal wear while lighter upper walls maintain brightness. This practical approach offers endless color combinations.
Bold Dramatic Colors: Don’t fear strong colors in traditional panelling. Rich library greens, deep dining room reds, or sophisticated grays create stunning backdrops for period furniture and artwork.
Integration with Modern Elements
Traditional wall panelling traditional style successfully coexists with contemporary furnishings when balanced thoughtfully. Clean-lined modern furniture contrasts beautifully against ornate panelling, creating dynamic, layered interiors. Key strategies include:
Contrast: Pair elaborate Victorian panelling with minimalist modern seating for striking juxtaposition Color Bridging: Use wall colors that complement both traditional panelling and contemporary furnishings Lighting: Modern lighting fixtures work surprisingly well against traditional panelling, providing functional illumination without period pastiche Artwork: Contemporary art gains impact when displayed against traditional panelling backgrounds
Cost Considerations and Budgeting
Material Cost Breakdown
Traditional wall panelling costs vary enormously depending on material choices, room size, and design complexity.
Budget Options (£30-£60 per square meter):
- MDF panels and mouldings
- Softwood pine framework
- Basic paint finishes
- DIY installation
- Simple panel designs
Mid-Range Options (£60-£120 per square meter):
- Quality MDF or basic hardwood
- More elaborate moulding profiles
- Professional painting
- Moderate design complexity
- Combination of DIY and professional work
Premium Options (£120-£300+ per square meter):
- Solid hardwood throughout (oak, mahogany)
- Complex multi-panel designs
- Hand-crafted custom mouldings
- Specialist traditional joinery
- Professional installation and finishing
- Natural wood finishes requiring multiple applications
Labor Costs
Professional installation typically costs £150-£400 per day depending on location and tradesperson expertise. Traditional panelling installation requires skilled carpentry, particularly for complex period recreation. Budget approximately:
- Basic wainscoting installation: 1-2 days per room
- Full-height panelling: 2-4 days per room
- Complex Victorian schemes: 4-8 days per room
- Painting/finishing: Additional 2-4 days
Cost-Saving Strategies
DIY Installation: Competent DIY enthusiasts can install traditional panelling with basic carpentry skills, saving significant labor costs. Start with simpler designs before tackling complex schemes.
Material Substitution: MDF instead of hardwood saves substantially while achieving virtually identical painted finishes. Reserve expensive hardwoods for natural-finish feature walls.
Partial Panelling: Dado-height panelling provides traditional character at approximately half the material cost of full-height installation while protecting vulnerable lower wall areas.
Simplified Designs: Fewer, larger panels require less framework and moulding, reducing both material costs and installation time without sacrificing traditional appearance.
Gradual Implementation: Panel priority rooms first, spreading costs over time while refining installation techniques on less visible areas before tackling principal rooms.
Maintenance and Long-Term Care
Cleaning Traditional Panelling
Proper maintenance ensures traditional wall panelling remains beautiful for generations.
Painted Panelling:
- Regular dusting with soft cloths or vacuum brush attachments
- Occasional washing with mild detergent solution and soft cloths
- Avoid abrasive cleaners that damage paint finishes
- Touch up scratches and marks promptly to prevent deterioration
- Repaint every 8-12 years depending on wear and finish quality
Natural Wood Panelling:
- Dust regularly to prevent dirt accumulation in moulding details
- Clean with appropriate wood cleaners following product directions
- Reapply wax, oil, or varnish as needed (annually to every few years)
- Avoid excessive water exposure
- Polish periodically to maintain luster
Addressing Common Problems
Cracks and Gaps: Timber panelling naturally expands and contracts with humidity changes. Small seasonal gaps are normal. Persistent large gaps suggest installation issues or extreme moisture fluctuations. Address humidity problems before attempting repairs.
Water Damage: Traditional panelling protects walls but requires prompt attention if water damage occurs. Remove damaged sections, address moisture sources, allow thorough drying, and replace affected components. Proper ventilation prevents most bathroom panelling problems.
Paint Deterioration: Chips, cracks, and peeling paint require preparation and repainting. Sand damaged areas smooth, prime bare wood, and repaint matching existing finishes. Quality paint properly applied provides decades of service.
Structural Movement: Buildings settle over time, occasionally causing panelling to separate from walls or develop alignment issues. Carefully refasten loose sections, fill gaps with decorator’s caulk, and repaint. Significant structural movement may indicate serious building problems requiring professional assessment.
Frequently Asked Questions
Q: Can I install traditional panelling in a modern new-build home? A: Absolutely. Traditional wall panelling adds instant character to bland modern interiors. Adjust proportions to suit contemporary ceiling heights (often lower than period properties) and select simplified designs that complement rather than conflict with modern architecture.
Q: How much does traditional wall panelling cost? A: Costs range from £30-£300+ per square meter depending on materials, complexity, and installation method. DIY MDF installations represent the budget end, while professionally-installed solid hardwood panelling with natural finishes costs significantly more.
Q: Is MDF suitable for traditional panelling? A: Yes, absolutely. High-quality MDF produces excellent results for painted traditional panelling, offering smooth surfaces, stability, and cost-effectiveness. Use moisture-resistant MDF in bathrooms and kitchens.
Q: What’s the best height for traditional panelling? A: Standard options include dado height (900-1100mm), wainscoting (750-900mm), or full height (floor to ceiling). Choose based on room proportions, practical requirements, and desired visual impact. Dado height offers excellent balance of protection and visual interest.
Q: Can I paint over existing wood panelling? A: Yes, painting transforms dated dark panelling into fresh, modern traditional features. Clean thoroughly, lightly sand to provide key, apply quality primer, and finish with appropriate topcoat. Consider professional advice for valuable antique panelling.
Q: How do I achieve authentic period detail? A: Research your chosen era thoroughly, study genuine examples, use period-appropriate proportions and moulding profiles, select authentic colors, and maintain consistency throughout. Consider consulting conservation specialists for strict period accuracy.
Q: Will panelling make small rooms feel smaller? A: Potentially, but thoughtful design mitigates this. Light colors, simplified designs, and wainscoting rather than full-height panelling maintain openness. Vertical panel orientations create height illusion in low-ceilinged rooms.
Q: How long does panelling installation take? A: Simple wainscoting might be completed in a weekend, while elaborate full-height Victorian panelling could require several weeks. Average rooms with moderate complexity typically take 3-7 days including finishing.
Q: Is traditional panelling suitable for bathrooms? A: Yes, with appropriate materials and finishes. Use moisture-resistant MDF or properly sealed timber, ensure adequate ventilation, and apply water-resistant paint or varnish. Traditional tongue-and-groove panelling particularly suits bathrooms.
Q: Can I install panelling over wallpaper? A: Not recommended. Remove wallpaper first to ensure proper adhesion and avoid lumpy appearances. Panelling installed over wallpaper may eventually fail as adhesive bonds weaken.
Conclusion: Creating Timeless Traditional Elegance
Traditional wall panelling represents one of interior design’s most enduring and versatile approaches to creating beautiful, characterful living spaces. From the mathematical precision of Georgian raised panels to the rich complexity of Victorian dado schemes, wall panelling traditional styles offer solutions for virtually any interior aesthetic and practical requirement.
Success in achieving authentic traditional panelling lies in understanding historical precedents, selecting appropriate materials, maintaining careful proportions, and executing installation with precision and care. Whether you choose elaborate full-height oak panelling in formal reception rooms or simple painted wainscoting in family areas, traditional panelling transforms ordinary walls into architectural features that delight the eye and enhance daily living.
The investment in quality traditional wall panelling—whether measured in money, time, or both—yields returns far exceeding initial costs. Property values increase, rooms gain character and distinction, and living environments become more comfortable and beautiful. Traditional panelling installed with care and maintained properly will serve multiple generations, becoming cherished features that future owners treasure.
Begin your traditional panelling journey by thoroughly researching your preferred period style, carefully planning layouts and proportions, selecting quality materials appropriate to your budget, and proceeding with patience and precision. The results—walls transformed into works of architectural art—justify every effort invested in this rewarding traditional craft.
Traditional wall panelling isn’t merely decoration; it’s architectural heritage made accessible, bringing the elegance, craftsmanship, and timeless beauty of period design into contemporary homes. Embrace this wonderful tradition and create interiors that honor the past while serving the present and enduring into the future.